Complete Guide: Deploying DeepSeek R1 on an R
Introduction DeepSeek R1 is a powerful open-source l...


You’re about to stand up a personal AI assistant on a small, affordable server. This beginner’s guide shows how to provision an Ubuntu 22.04 VPS, install Node.js 22, add a swap file for stability, and use the Clawdbot CLI to onboard and run a persistent gateway service. We’ll keep commands short and verification steps clear so you can copy, paste, and confirm each milestone.
What you’ll end up with: a Clawdbot gateway running as a systemd user service, connected to at least one LLM provider and one messaging channel, with basic firewall rules and simple update procedures.

Clawdbot’s official guidance requires modern Node.js. According to the gateway install pages, Node.js 22 or newer is the supported runtime for both the Gateway and CLI. See the installation overview in the Clawdbot docs under the page titled Install and the Linux platform notes for version specifics.
Disclosure: SurferCloud is our product. Get Started: https://www.surfercloud.com/promos/ulighthost
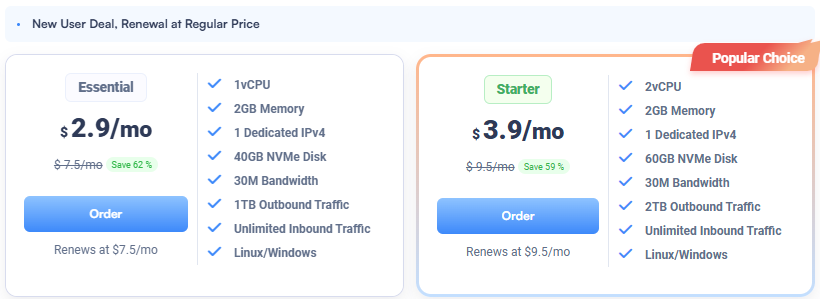
Use a 2GB RAM plan so installs and updates complete reliably. You can browse current plans on the ULightHost page where the 1 vCPU, 2GB RAM, 40GB NVMe tier is shown.
If you need help with payment methods or account setup, reach out via the SurferCloud Contact page for assistance and billing guidance.
When the server is ready, note the public IP and the default Ubuntu username. On many cloud images, the user is ubuntu for Ubuntu 22.04. If your panel specifies a different username, use that.
From your local machine, connect to the VPS. Replace 203.0.113.10 with your server IP.
ssh ubuntu@203.0.113.10
Update system packages and install a few essentials. These tools help with builds, TLS, and diagnostics.
sudo apt update && sudo apt -y upgrade
sudo apt -y install git curl build-essential jq ca-certificates openssl ufw htop
Optional but helpful: set your timezone and verify free disk space.
sudo timedatectl set-timezone UTC
free -h && df -h
Clawdbot requires Node.js 22 or newer. The NodeSource repository is a straightforward way to get current Node on Ubuntu 22.04. For background and supported commands, see the NodeSource distributions README.
curl -fsSL https://deb.nodesource.com/setup_22.x | sudo -E bash -
sudo apt-get install -y nodejs
node --version && npm --version
You should see a node version starting with v22 and a recent npm. If node prints an older version, repeat the steps and ensure there were no errors. If you prefer to validate requirements and onboarding flow, consult the Clawdbot documentation’s Install and Linux platform sections.
On a 2GB VPS, a modest swap file reduces the chance of out-of-memory kills during package installs or when Clawdbot loads dependencies. The standard Ubuntu swap-file procedure below is commonly used. For more background, consult Ubuntu’s community documentation on swap configuration.
sudo fallocate -l 2G /swapfile
sudo chmod 600 /swapfile
sudo mkswap /swapfile
sudo swapon /swapfile
echo '/swapfile none swap sw 0 0' | sudo tee -a /etc/fstab
sudo sysctl vm.swappiness=10
Verify that swap is active:
free -h
swapon --show
You should see Swap with approximately 2.0G total. If not, re-run the commands and check /etc/fstab for the swap entry.
Now you’ll install the Clawdbot CLI globally, run the onboarding wizard, and install a persistent service. The official Clawdbot install and wizard pages describe this flow, including what the onboarding wizard configures.
Install the CLI:
sudo npm install -g clawdbot@latest
clawdbot --version
Run the onboarding wizard and install the user-level systemd service for the gateway:
clawdbot onboard --install-daemon
The wizard will prompt you to:
When onboarding completes, the gateway service is installed under your user account.
On Linux, user services stop when you log out unless lingering is enabled. Turn it on and check the service status.
sudo loginctl enable-linger "$USER"
systemctl --user daemon-reload
systemctl --user enable --now clawdbot-gateway.service
systemctl --user status clawdbot-gateway.service
You should see Active: active (running). If it’s not running, inspect logs:
journalctl --user -u clawdbot-gateway.service -f
Clawdbot also includes health and status commands. They provide quick diagnostics:
clawdbot status
clawdbot health
clawdbot gateway status
clawdbot gateway probe
Look for lines like Gateway reachable and a local probe URL such as ws://127.0.0.1:18789.
Keep the gateway bound to localhost unless you specifically need remote access or webhooks. For basic protection, configure UFW to allow SSH and otherwise deny inbound traffic.
sudo ufw allow OpenSSH
sudo ufw enable
sudo ufw status verbose
If you must expose a webhook or an admin endpoint on a domain, consider using NGINX as a reverse proxy with TLS via Certbot.
Example sketch with a domain of example.com:
sudo apt -y install nginx
sudo ufw allow 'Nginx Full'
# create a simple server block proxying to the local gateway port if needed
sudo nano /etc/nginx/sites-available/clawdbot.conf
Paste a minimal proxy and adjust the upstream port to match your gateway’s binding (keep it on 127.0.0.1):
server {
    listen 80;
    server_name example.com;

    location / {
        proxy_pass http://127.0.0.1:18789;
        proxy_set_header Host $host;
        proxy_set_header X-Real-IP $remote_addr;
        proxy_set_header X-Forwarded-For $proxy_add_x_forwarded_for;
        proxy_http_version 1.1;
        proxy_set_header Upgrade $http_upgrade;
        proxy_set_header Connection "upgrade";
    }
}
Enable the site and obtain a certificate:
sudo ln -s /etc/nginx/sites-available/clawdbot.conf /etc/nginx/sites-enabled/
sudo nginx -t && sudo systemctl reload nginx
sudo snap install core; sudo snap refresh core
sudo snap install --classic certbot
sudo certbot --nginx -d example.com
If you don’t need public access, skip NGINX entirely and rely on local binding with UFW protecting the host.
A few basics keep things smooth on a small VPS.
htop
free -h
journalctl --user -u clawdbot-gateway.service -n 50
sudo npm install -g clawdbot@latest
clawdbot gateway restart
clawdbot status && clawdbot health
You now have a working Clawdbot gateway on a small Ubuntu 22.04 VPS, with a stable Node.js 22 runtime, swap for resilience, and a persistent systemd user service. Add more channels, wire up additional providers, or script non-interactive onboarding for repeatable setups using the flags described in the Clawdbot documentation.
If you’d like help choosing a plan, payment options, or migrating to a larger instance, contact the team through the SurferCloud Contact page.
Selected references for deeper reading


