SurferCloud Blog SurferCloud Blog
  • HOME
  • NEWS
    • Latest Events
    • Product Updates
    • Service announcement
  • TUTORIAL
  • COMPARISONS
  • INDUSTRY INFORMATION
  • Telegram Group
  • Affiliates
  • English
    • 中文 (中国)
    • English
SurferCloud Blog SurferCloud Blog
  • HOME
  • NEWS
    • Latest Events
    • Product Updates
    • Service announcement
  • TUTORIAL
  • COMPARISONS
  • INDUSTRY INFORMATION
  • Telegram Group
  • Affiliates
  • English
    • 中文 (中国)
    • English
  • banner shape
  • banner shape
  • banner shape
  • banner shape
  • plus icon
  • plus icon

Step-by-Step Guide: Launching Your First UHost Instance in Under 5 Minutes

January 9, 2026
2 minutes
Service announcement
13 Views

The cloud can feel intimidating, but it doesn't have to be. SurferCloud has streamlined the deployment process so that anyone—from a solo developer to an enterprise IT manager—can go from "Zero" to "Online" in less than five minutes. This guide will walk you through the process of launching your first Elastic Compute (UHost) instance.

Step-by-Step Guide: Launching Your First UHost Instance in Under 5 Minutes

Step 1: Choose Your Strategic Location

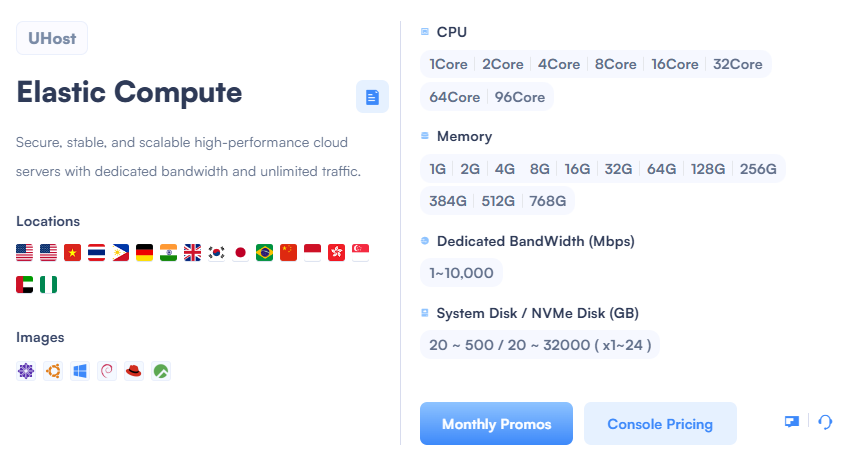
Log in to the SurferCloud Console. Start by selecting a region. Pro tip: Choose the location closest to your target audience to ensure the lowest latency. Whether it’s Singapore for SE Asia or Germany for Europe, we’ve got you covered.

Step 2: Configure Your "Elastic" Hardware

This is where the flexibility of UHost shines. You can select:

  • CPU: From 1Core for testing to 96Core for heavy lifting.
  • Memory: Choose from 1G up to 768G RAM.
  • Storage: Define your NVMe Disk size (up to 32,000 GB).

Step 3: Select Your Operating System

Pick the "Image" that fits your project. We support a wide range of Linux distributions (Ubuntu, CentOS, Debian) and Windows Server versions. Click the icon that represents your preferred environment.

Step 4: Network and Bandwidth

Decide on your Dedicated Bandwidth. Remember, SurferCloud offers Unlimited Traffic, so you only need to choose the speed (Mbps) that suits your peak requirements.

Step 5: Review and Launch

Before you hit "Create," head over to our Monthly Promos page to see if there’s a discount code or a specific regional sale that can save you money on your new instance. Once confirmed, your UHost will be ready in seconds!

After-Sales Support

Once your server is live, you can manage it entirely through our intuitive dashboard. If you encounter any issues during the setup:

  1. Check our documentation.
  2. Open a Work Ticket for 24/7 technical help.
  3. Fill out the Contact Form for billing or account questions.
Tags : Cloud Computing for Beginners Deploy Cloud Server Guide SurferCloud Tutorial UHost Setup

Related Post

2 minutes Service announcement

What is SurferCloud? Everything You Need to K

What is SurferCloud? SurferCloud is a professional clou...

5 minutes Latest Events

Unlock the Best Cloud Deals of 2024: SurferCl

SurferCloud’s biggest sale of the year is here! Start...

4 minutes Service announcement

Accelerate Your Business with SurferCloud Hou

In today’s fast-paced digital world, businesses requi...

Light Server promotion:

ulhost

Cloud Server promotion:

Affordable CDN

ucdn

2025 Special Offers

annual vps

Copyright © 2024 SurferCloud All Rights Reserved. Terms of Service. Sitemap.