Complete Guide: Deploying DeepSeek R1 on an R
Introduction DeepSeek R1 is a powerful open-source l...


Most AI assistants store your data on official servers, charge per message, and go offline as soon as you close the browser. OpenClaw works in a completely different way — it runs on your own cloud server, can connect to platforms like Telegram, WhatsApp, Slack, and Discord, and stays online 24/7 without interruption.
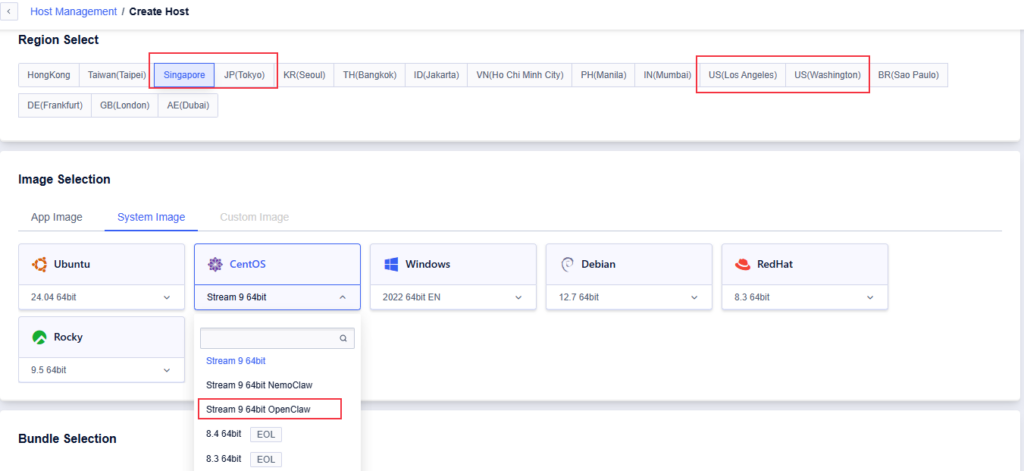
Now, SurferCloud provides a one-click OpenClaw template (CentOS Stream 9 64bit) on both Simple Application Server (ULightHost) and Elastic Compute (UHost) in its Japan, Singapore, Los Angeles, and Washington data centers.
With this template, OpenClaw can be deployed in just a few minutes.
In this guide, we will walk through the complete installation step-by-step.
OpenClaw is an open-source, self-hosted AI assistant.
You can connect it to:
Once connected, it can run as your personal AI assistant across multiple chat platforms.
Advantages of using OpenClaw + Cloud Server:
✔ All conversation data stays on your own server
✔ No per-message fees — only Cloud Server cost
✔ Runs online 24/7
✔ Freedom to choose any AI model
✔ Can connect to multiple chat platforms
Perfect for:
Before starting, make sure you have:
You can purchase the server either from our current promotions page or directly from the console.
Simple Application Server (ULightHost) promo page: https://www.surfercloud.com/promos/ulighthost
Elastic Compute (UHost) promo page: https://www.surfercloud.com/promos/uhost
Simple Application Server (ULightHost) console purchase: https://console.surfercloud.com/light-server/create/
Elastic Compute (UHost) console purchase: https://console.surfercloud.com/uhost/uhost/create
⚠️ Important: You must select one of the following data center locations:
Other regions do not include the preinstalled OpenClaw image. During system selection, make sure to choose the preinstalled image: CentOS Stream 9 64bit – OpenClaw.
After the server deployment is complete, you can initialize OpenClaw using the CLI tool.
This method works on most Cloud Server environments and is recommended for self-hosted setups.
Login to your Cloud Server via SSH and check the OpenClaw version:
clawdbot --versionIf installed correctly, the version number will be displayed.
Run the onboarding command:
# initialize configuration
openclaw onboard --install-daemon
This command will:
During the setup process, you will be asked to choose an AI provider.
Example options:
Select the provider you want to use.
Paste your API key when prompted.
Get your key from:
Example:
Enter API Key:
sk-xxxxxxxxxxxxxxxxTelegram is the easiest platform to integrate first.
Search for:
@BotFather
Start the chat and send:
/newbot
Follow the instructions to create a bot.
You will receive:
Bot Token
Go to OpenClaw dashboard:
Integrations
→ Telegram
→ Paste Bot Token
Open Telegram
Search for your bot
Send a message
Your AI assistant should reply immediately.
Your AI assistant is now:
Supported models:
You can continue connecting:
This allows you to build your own fully automated AI system.
OpenClaw + Cloud Server is ideal for:
If you want a private, always-online, multi-platform AI assistant, self-hosting OpenClaw on a cloud server is one of the best solutions.


